
Product Manuals & Support / Laboratory Timers / INF-TM3-44
Three-Channel Laboratory Timer
Model INF-TM3-44
Product Overview
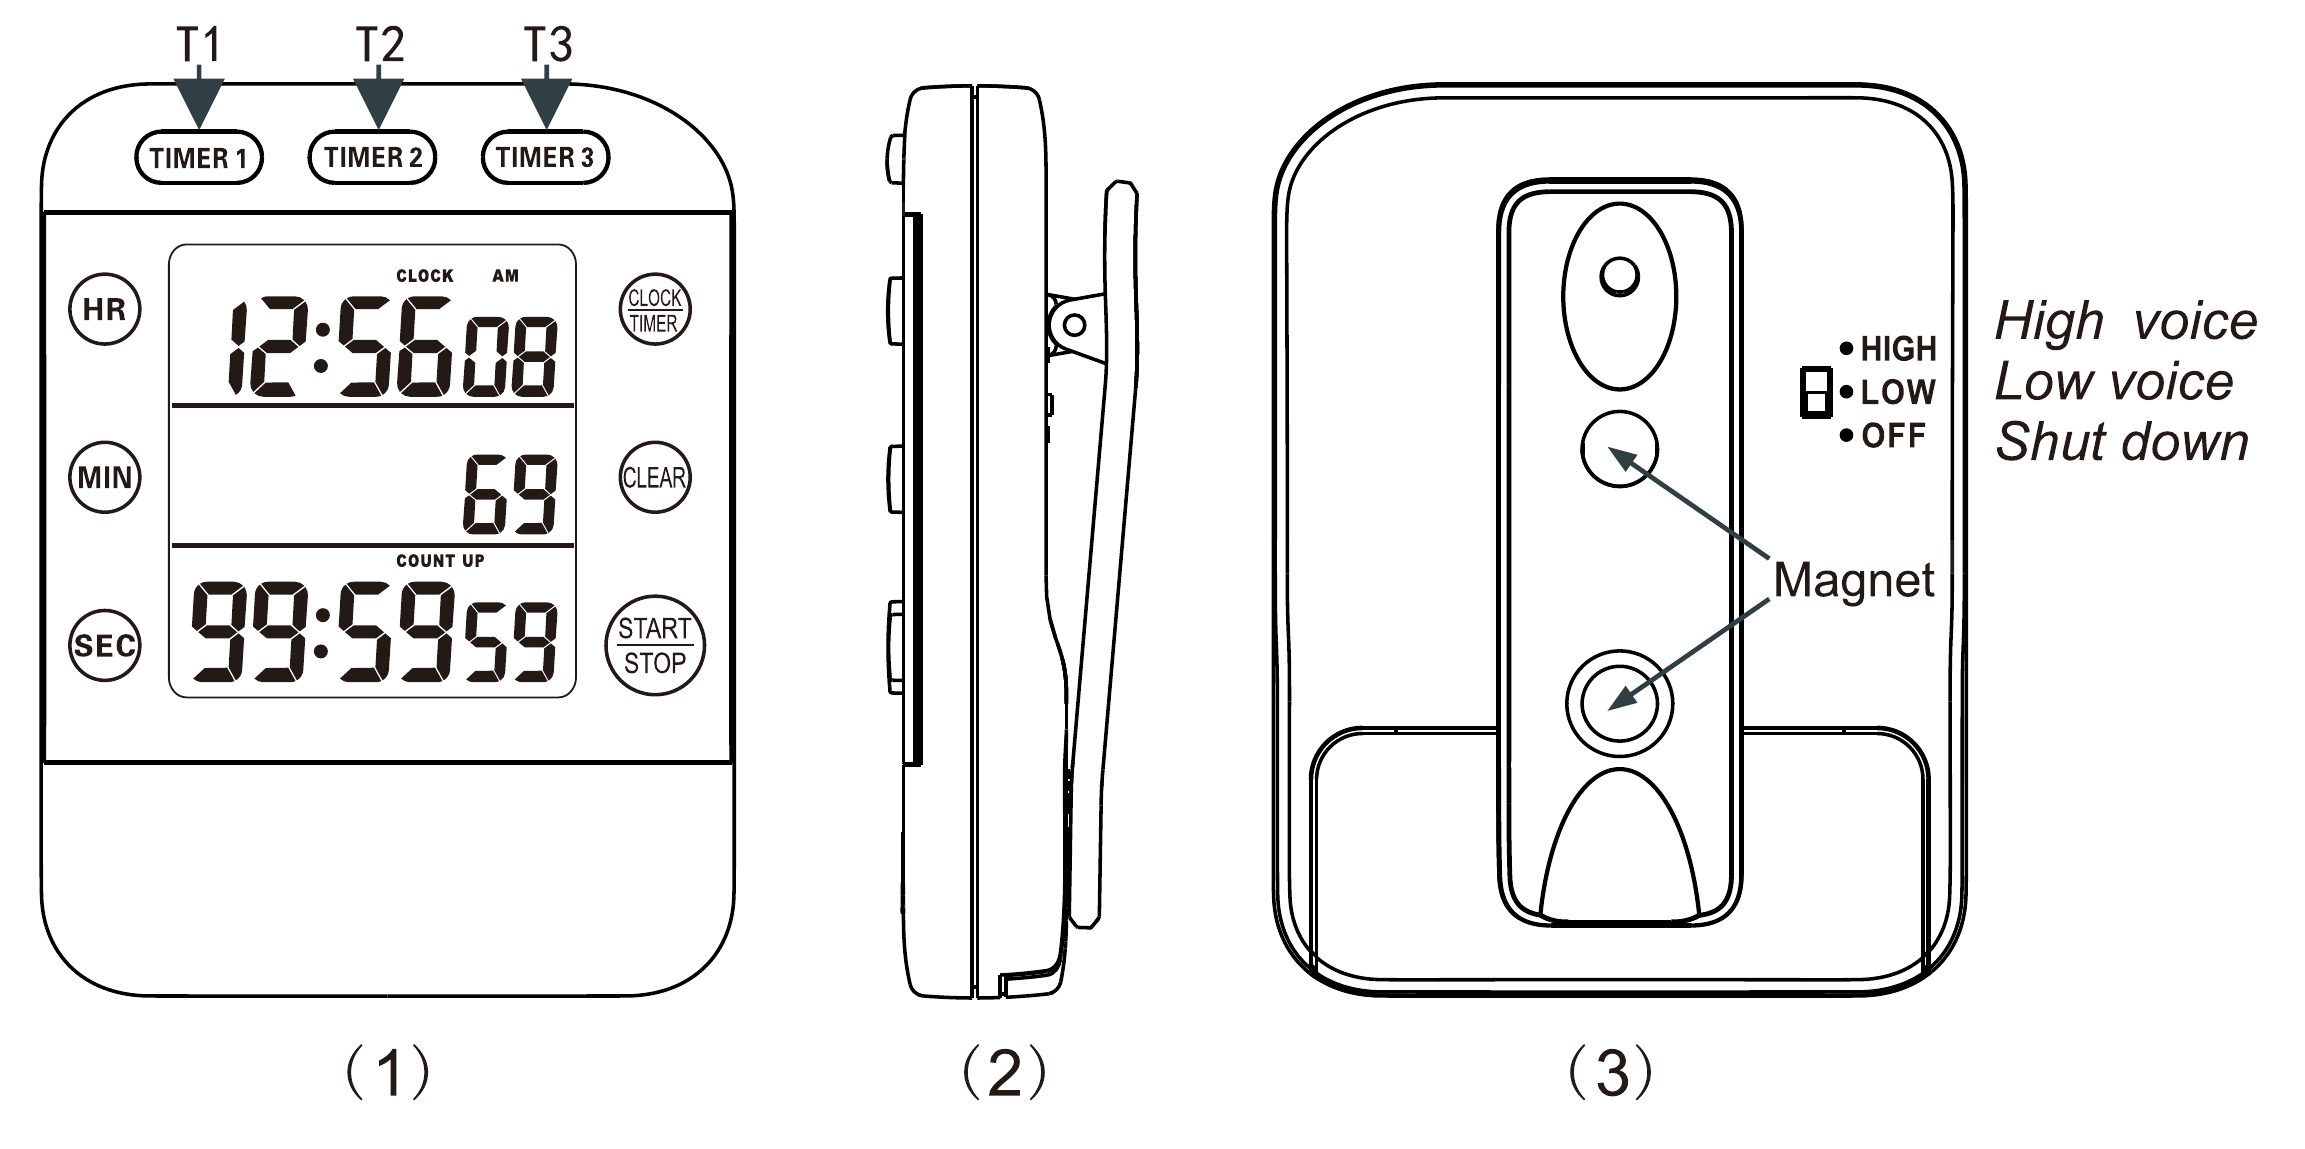
Specifications
- Clock display: hours, minutes and seconds; AM/PM indication; selectable 12- or 24-hour format.
- Count-up timer: resolution to 1/100 second; maximum duration 99 hours, 59 minutes and 59 seconds.
- Countdown timer: three independent channels (T1, T2 and T3); maximum setting 99 hours, 59 minutes and 59 seconds per channel.
- Alarm duration: approximately 1 minute.
- Alarm-volume selector: HIGH / LOW / OFF.
- Operating temperature: 0–50 °C.
- Power supply: two 1.5 V AAA batteries.
- Housing material: ABS.
- LCD size: approximately 4.38 × 3.98 cm.
- Product dimensions: approximately 8.82 × 6.62 × 1.32 cm; weight: approximately 90 g.
- Placement: fold-out stand for a work surface and magnets for attachment to a suitable metal surface.
Clock and Count-Up Mode
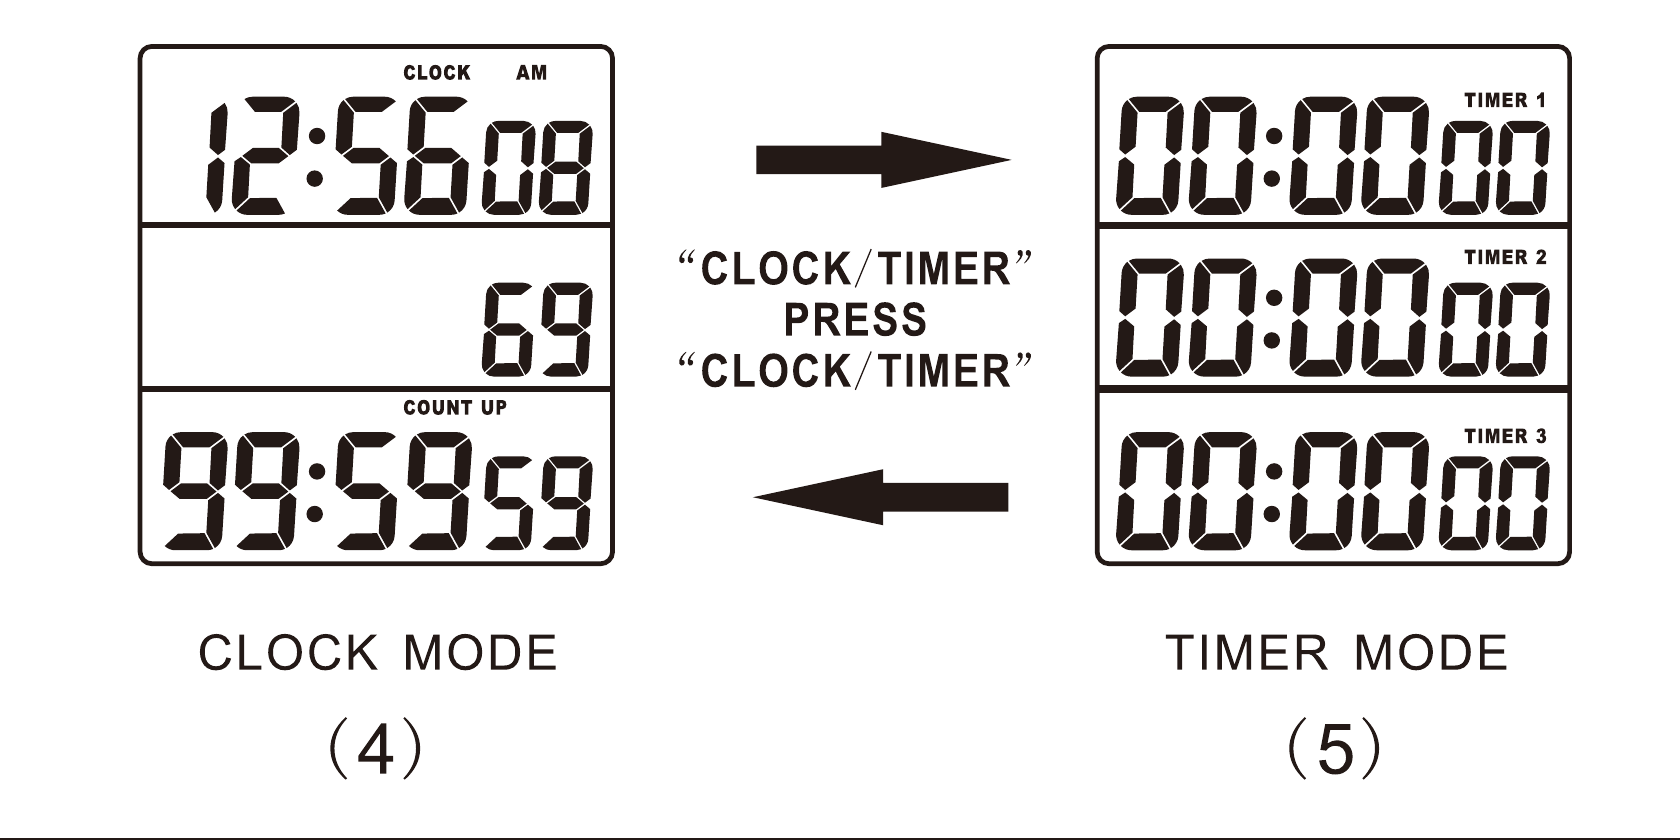
Switching between modes
Press CLOCK/TIMER to switch between the normal clock/count-up display and the three-channel countdown display.
Setting the clock
- In the normal clock display, press and hold CLOCK/TIMER for approximately 2 seconds until the hour, minute and second values flash.
- Press HR, MIN and SEC to set the required values. Press and hold a button to advance its value quickly.
- Press CLOCK/TIMER to confirm the setting and return to the normal clock display.
To change between 12- and 24-hour display formats while the clock is running normally, press HR, MIN or SEC.
Using the count-up timer
- While the normal clock/count-up display is shown, press START/STOP to start counting up.
- Press START/STOP to pause. Press it again to continue.
- While paused, press CLEAR to reset the count-up value to zero.
Three-Channel Countdown Timers
Setting T1, T2 or T3
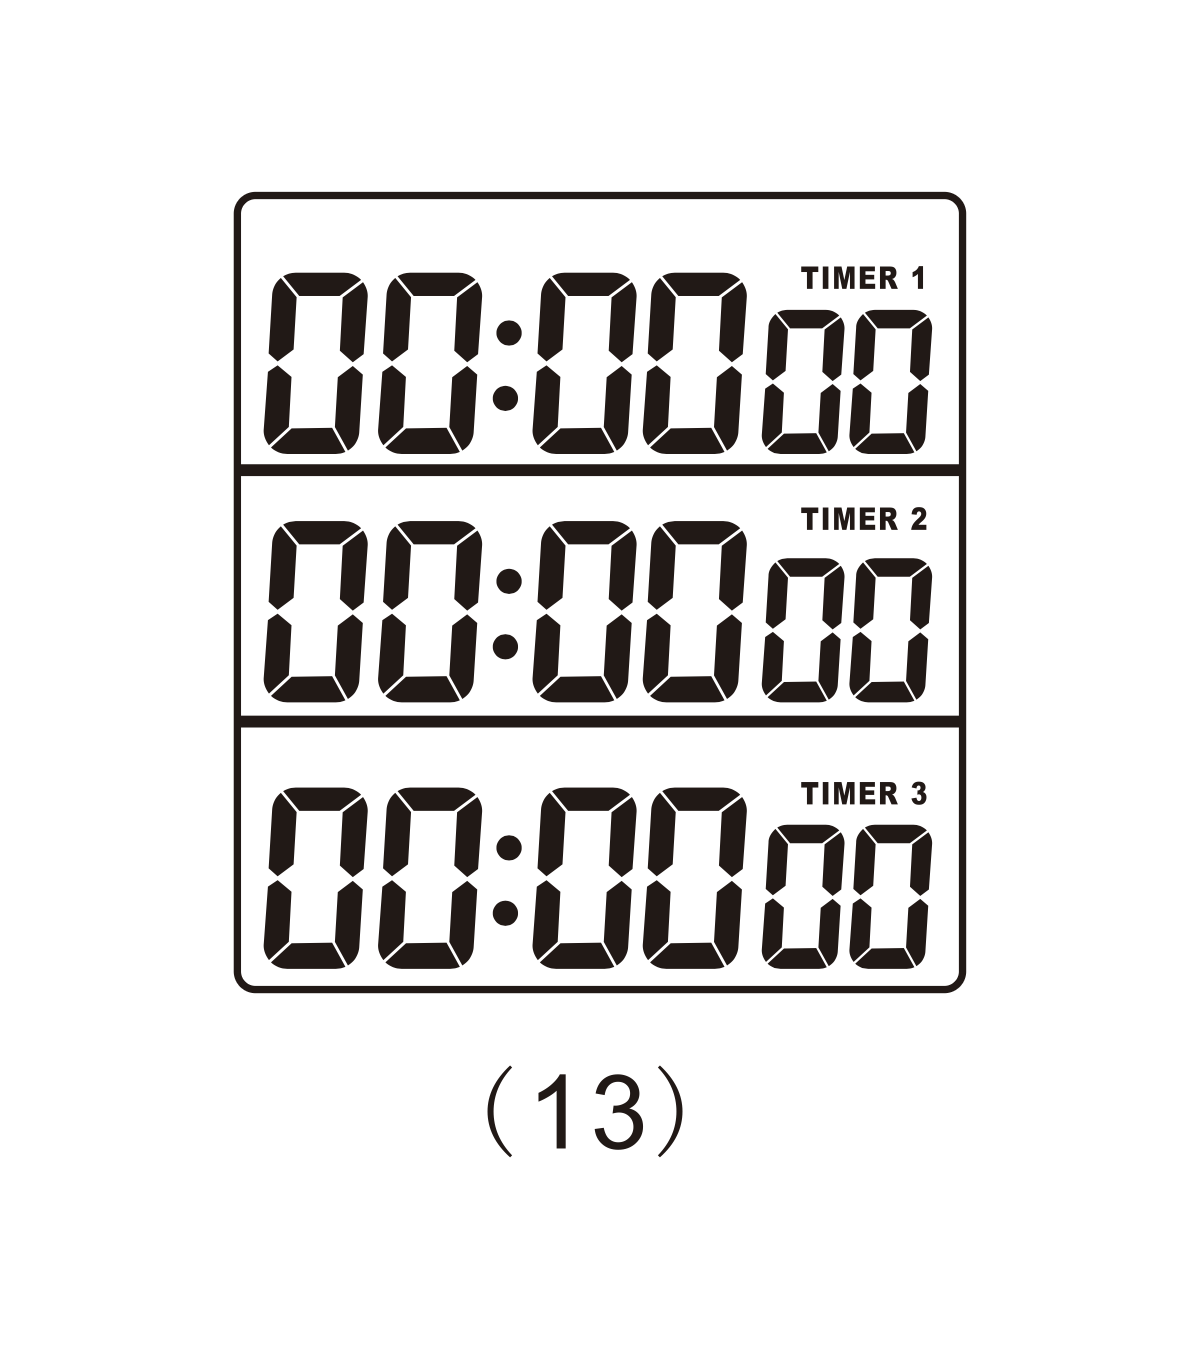
- Press CLOCK/TIMER to display the three countdown channels.
- Press and hold the required channel button (T1, T2 or T3) for approximately 2 seconds until that channel’s value flashes.
- Press HR, MIN and SEC to enter the required countdown time. Press and hold a button to advance its value quickly.
- Press CLEAR to clear the value being edited, if necessary.
- Press the same channel button again to confirm the setting.
- Exit the current channel’s setting mode before setting another channel.
Starting, pausing and resetting a countdown
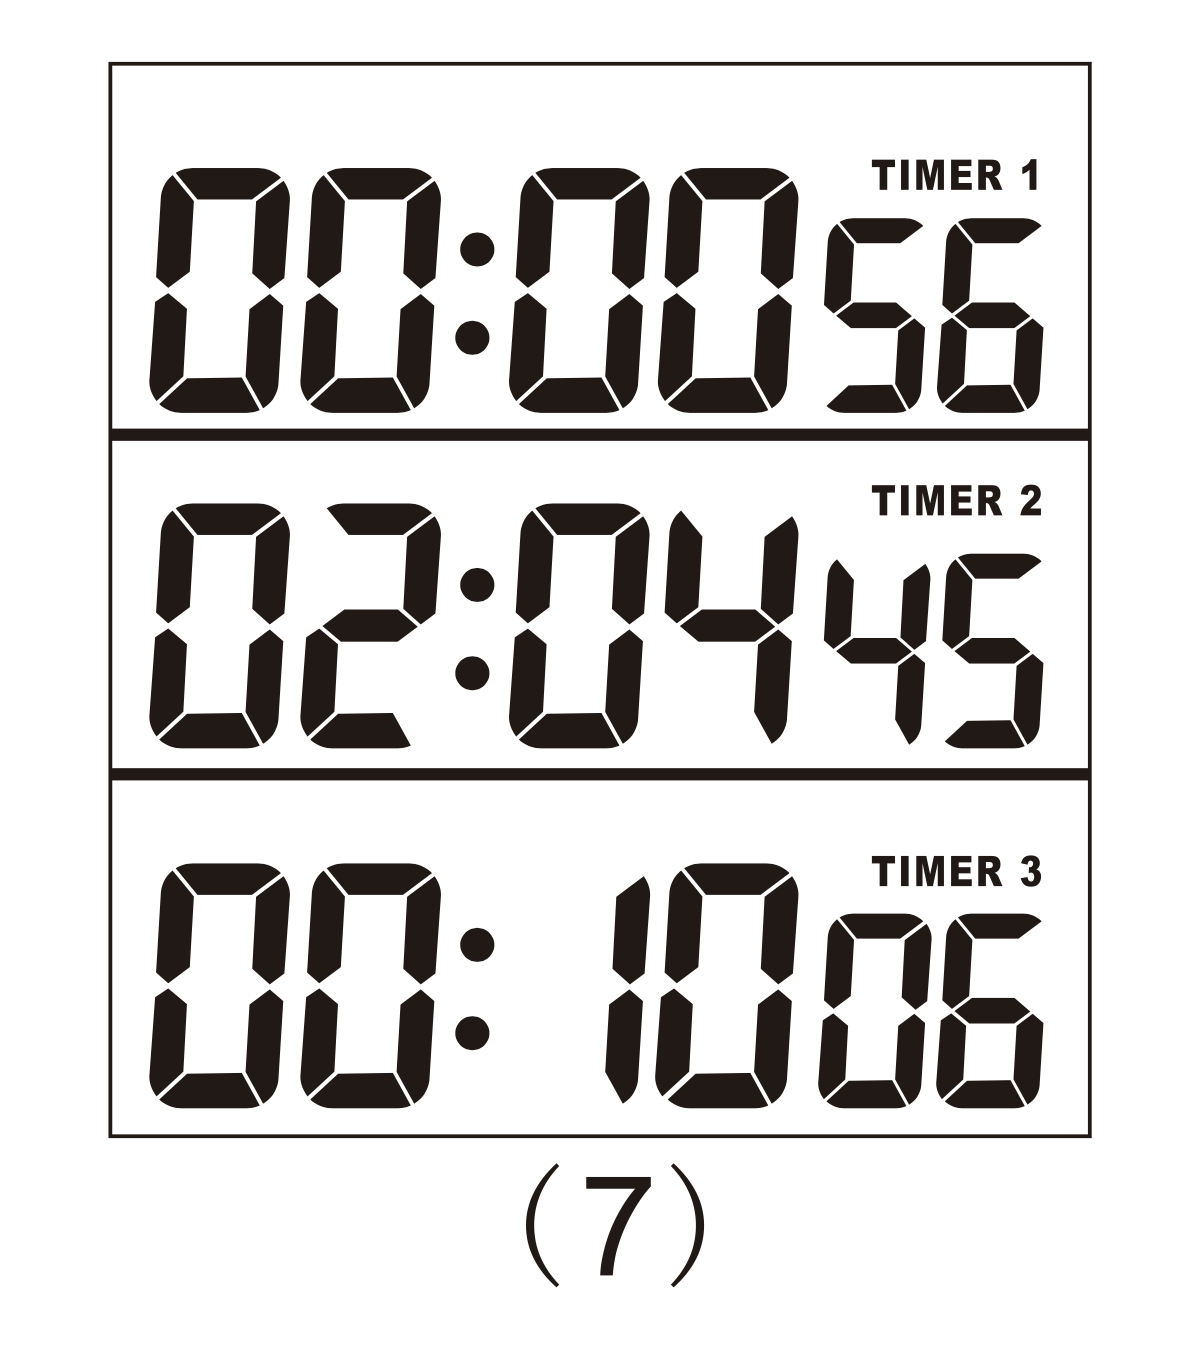
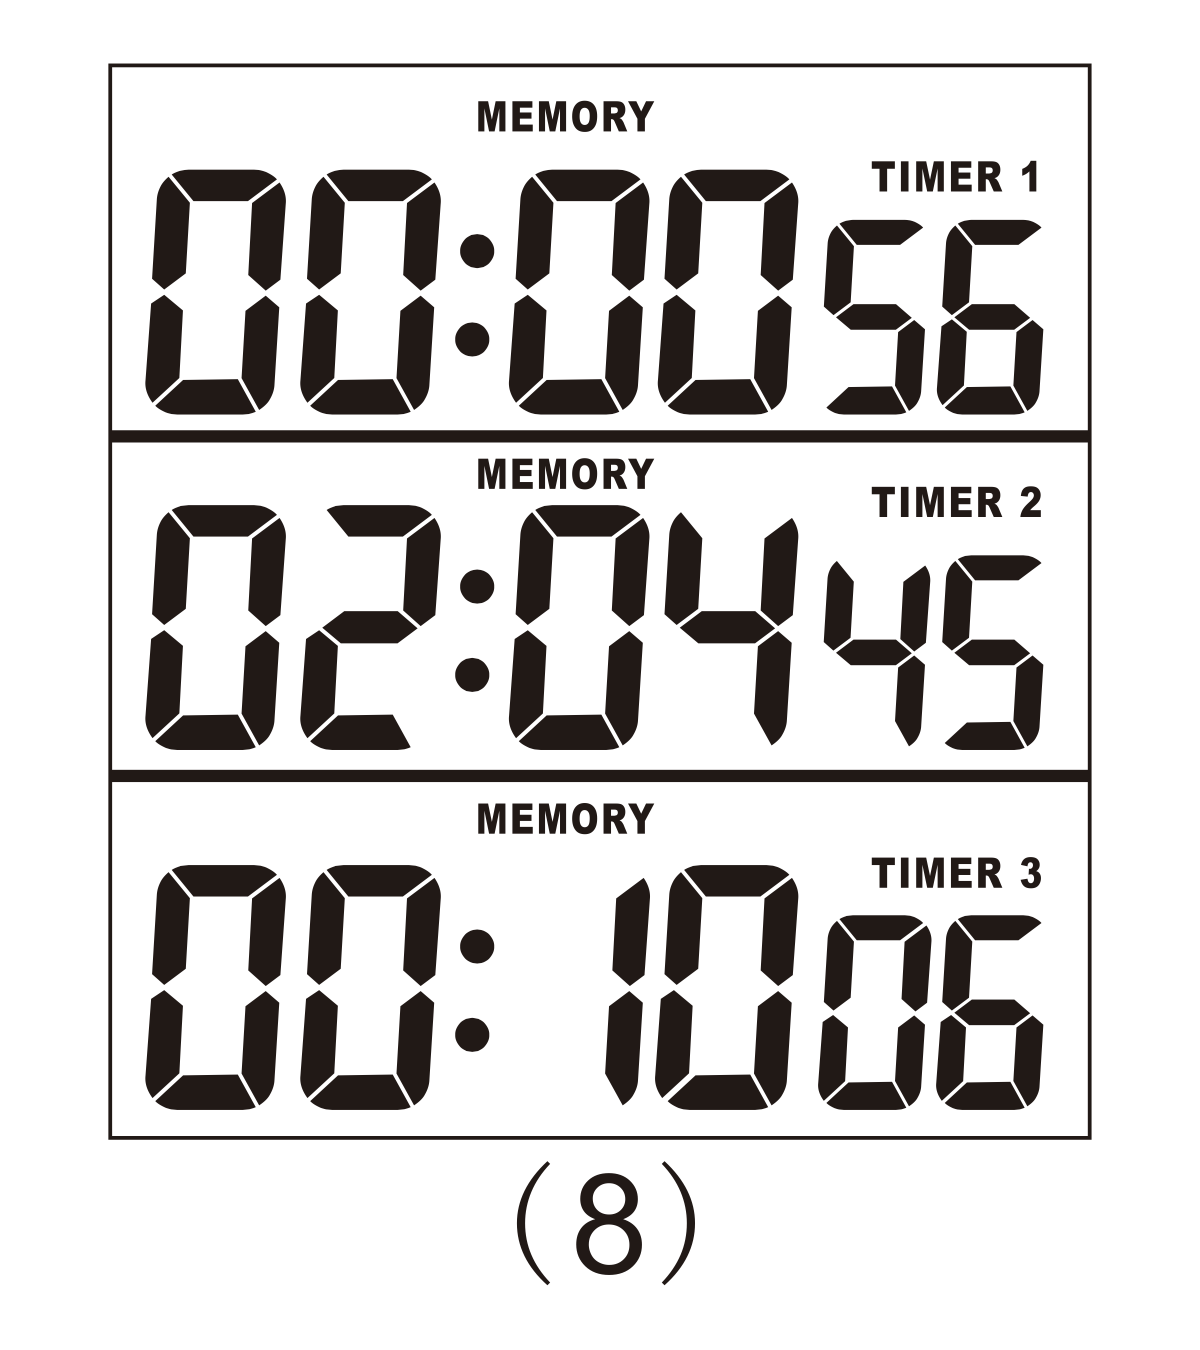
- Press T1, T2 or T3 to start its countdown. The three channels can operate independently.
- Press the corresponding channel button again to pause that countdown. Press it again to continue.
- When the normal clock/count-up display is shown, the corresponding TIMER 1, TIMER 2 or TIMER 3 indicator flashes while that channel is counting down.
- While one or more countdowns are paused, press CLEAR to reset the paused countdown values to zero.
Alarm and Memory Functions
When a countdown reaches zero
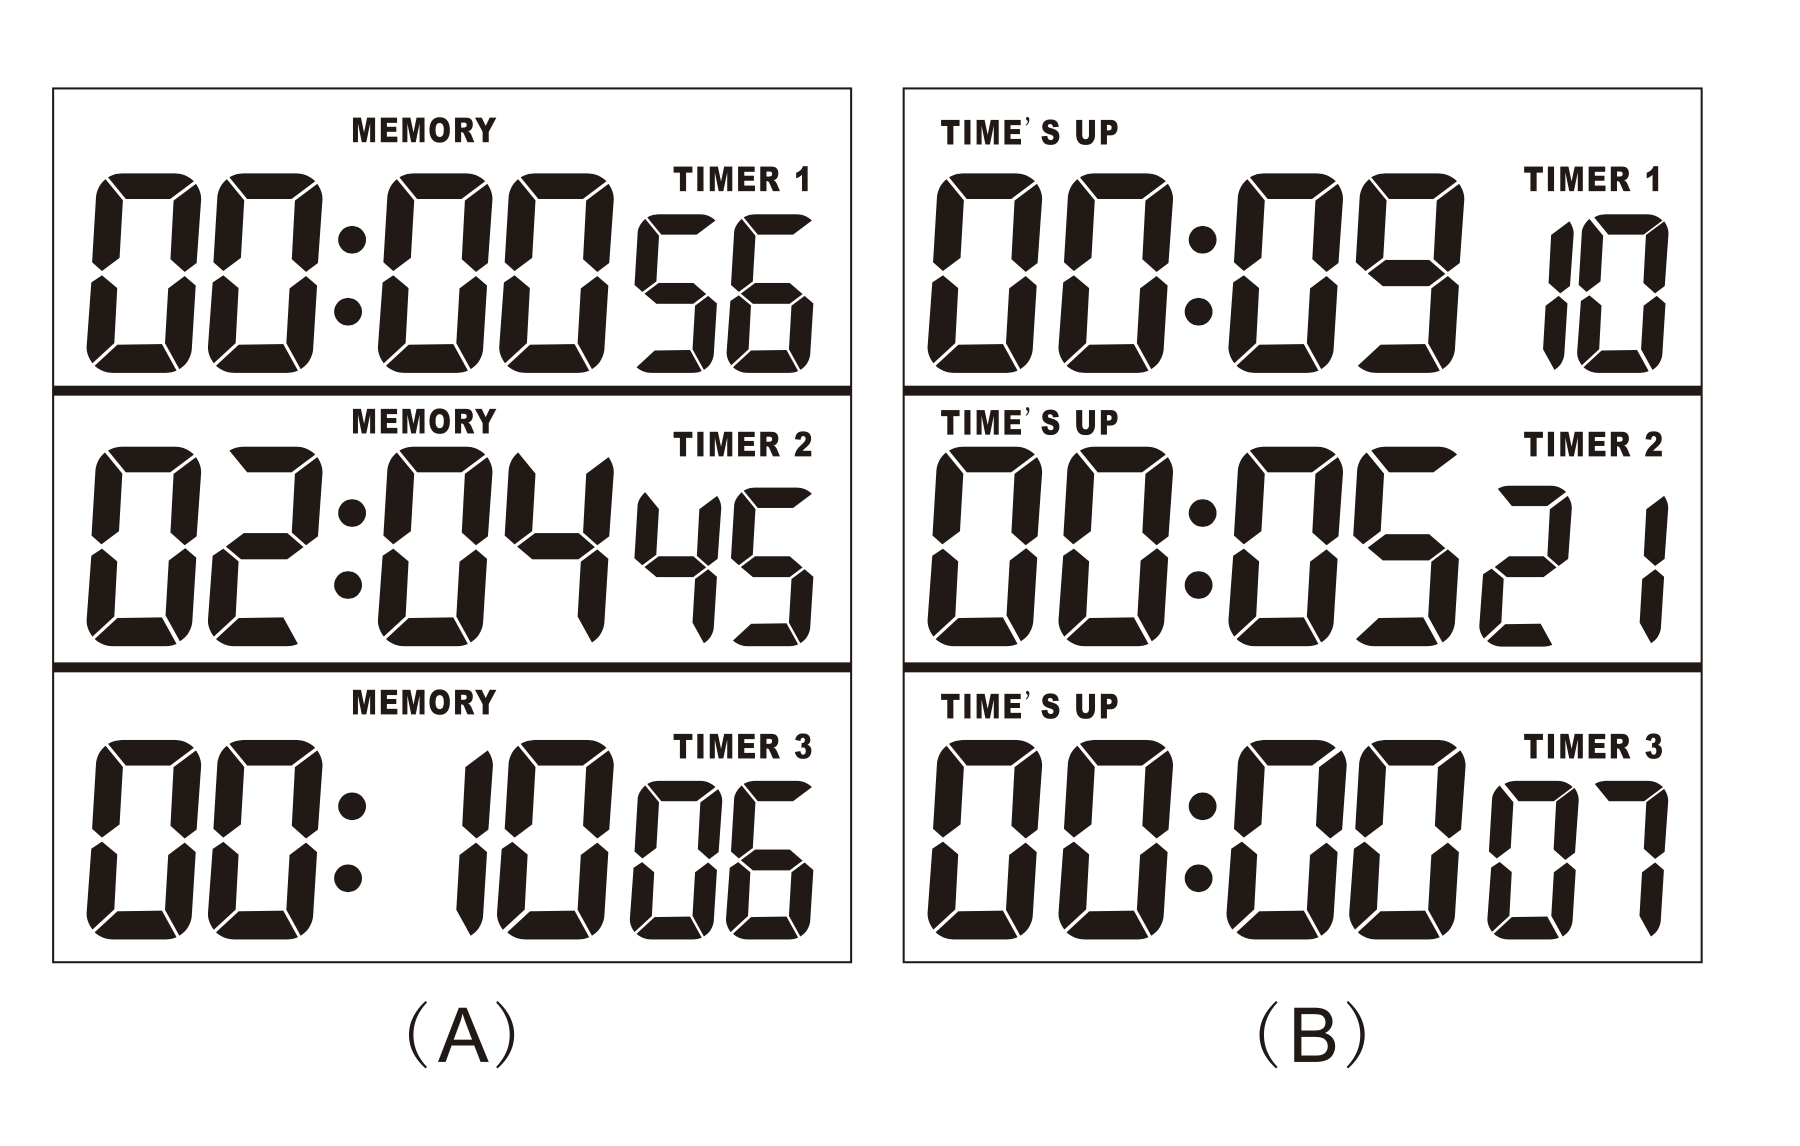
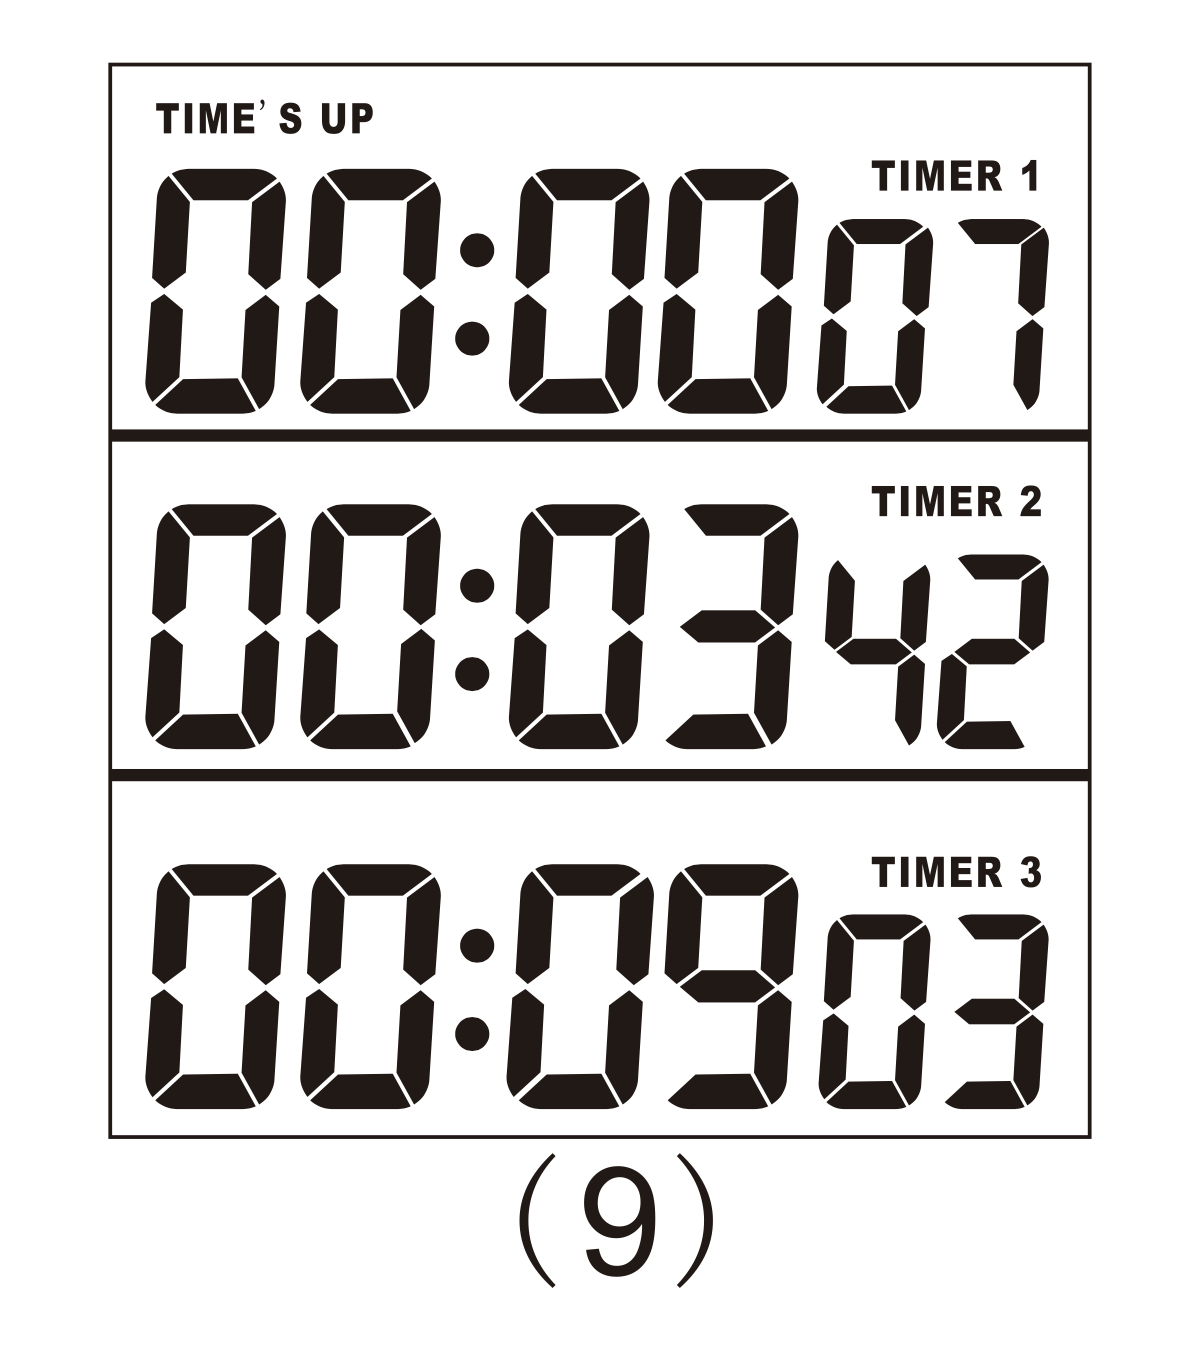
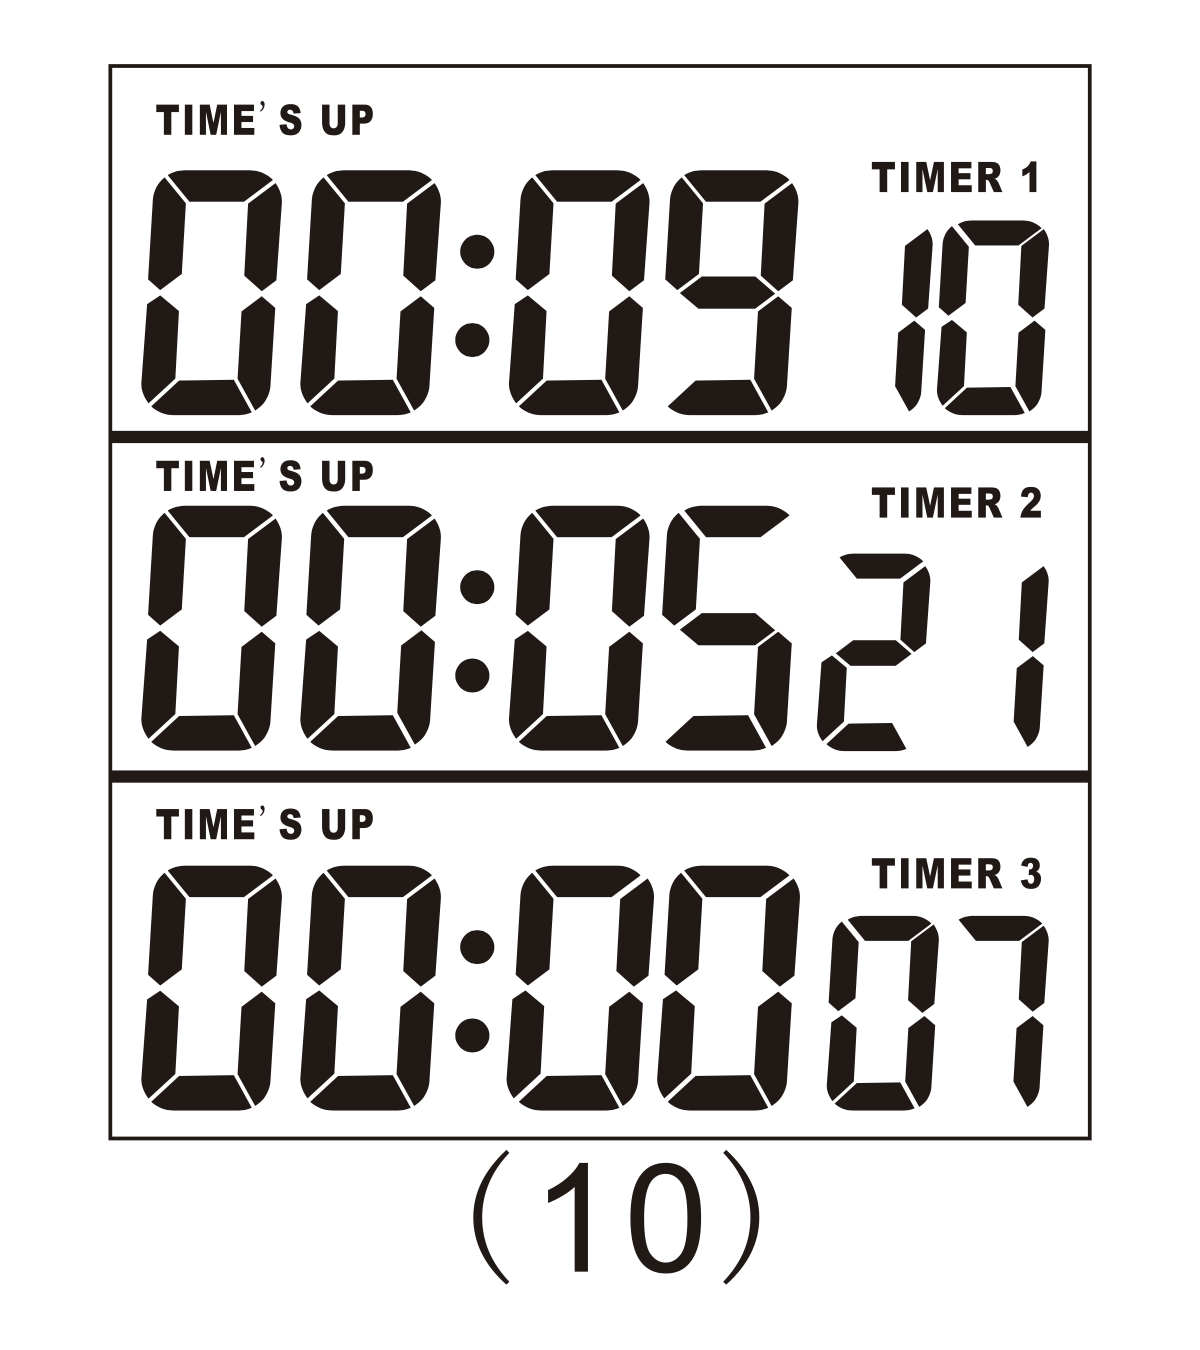
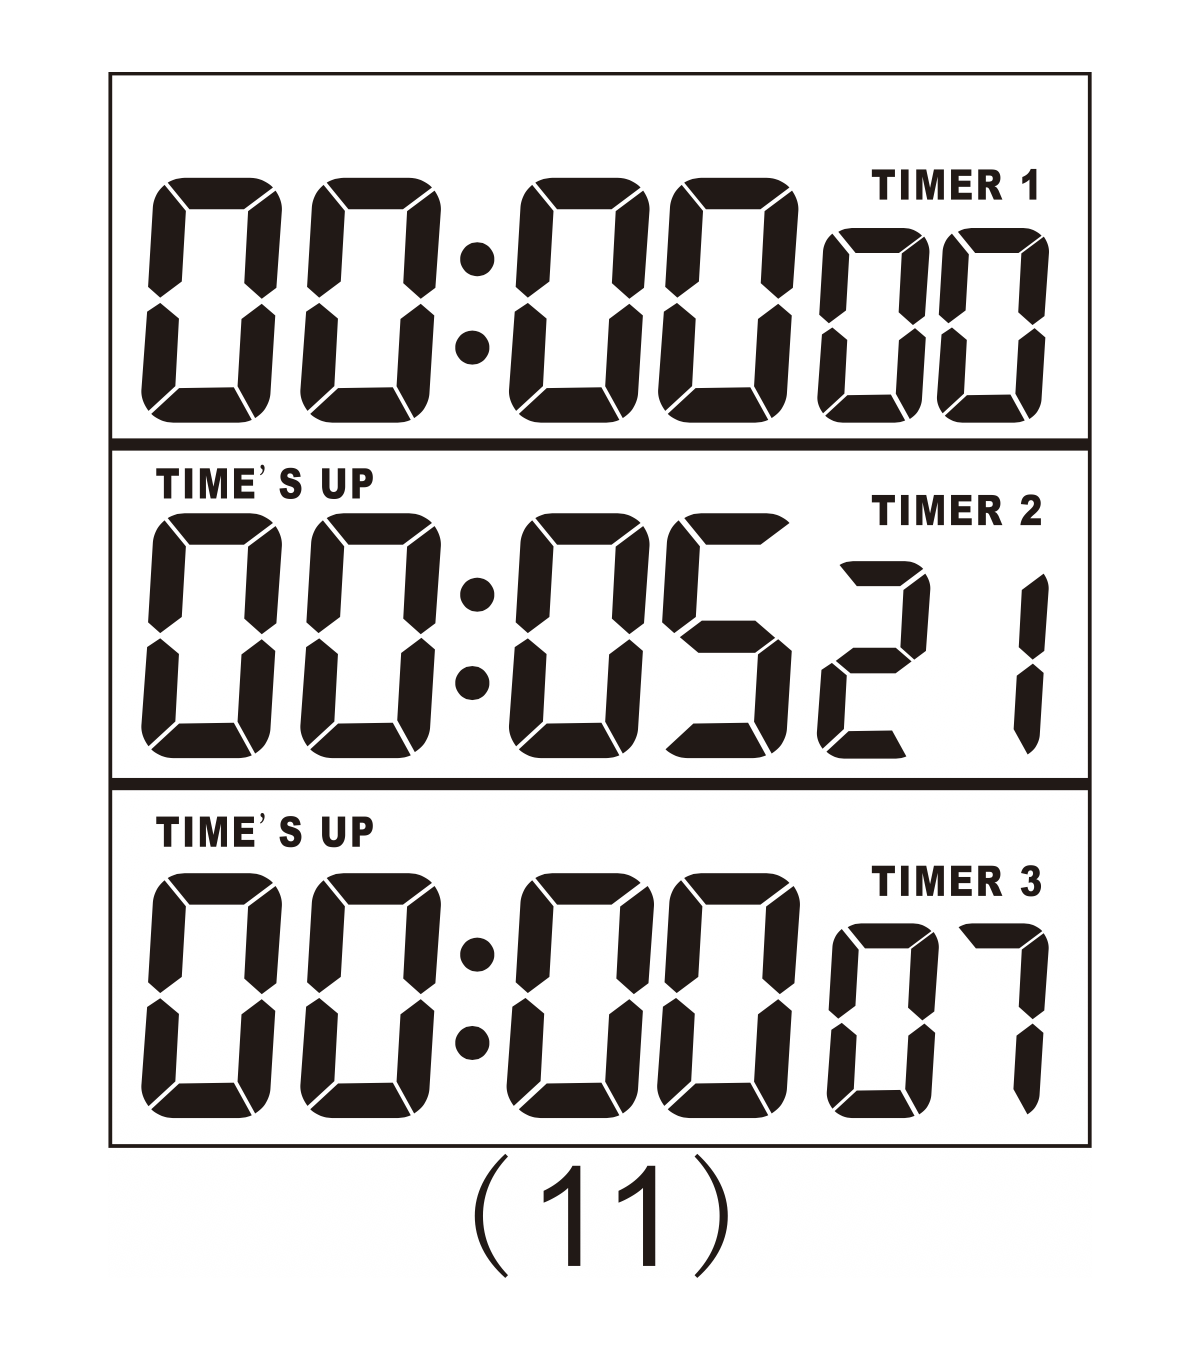
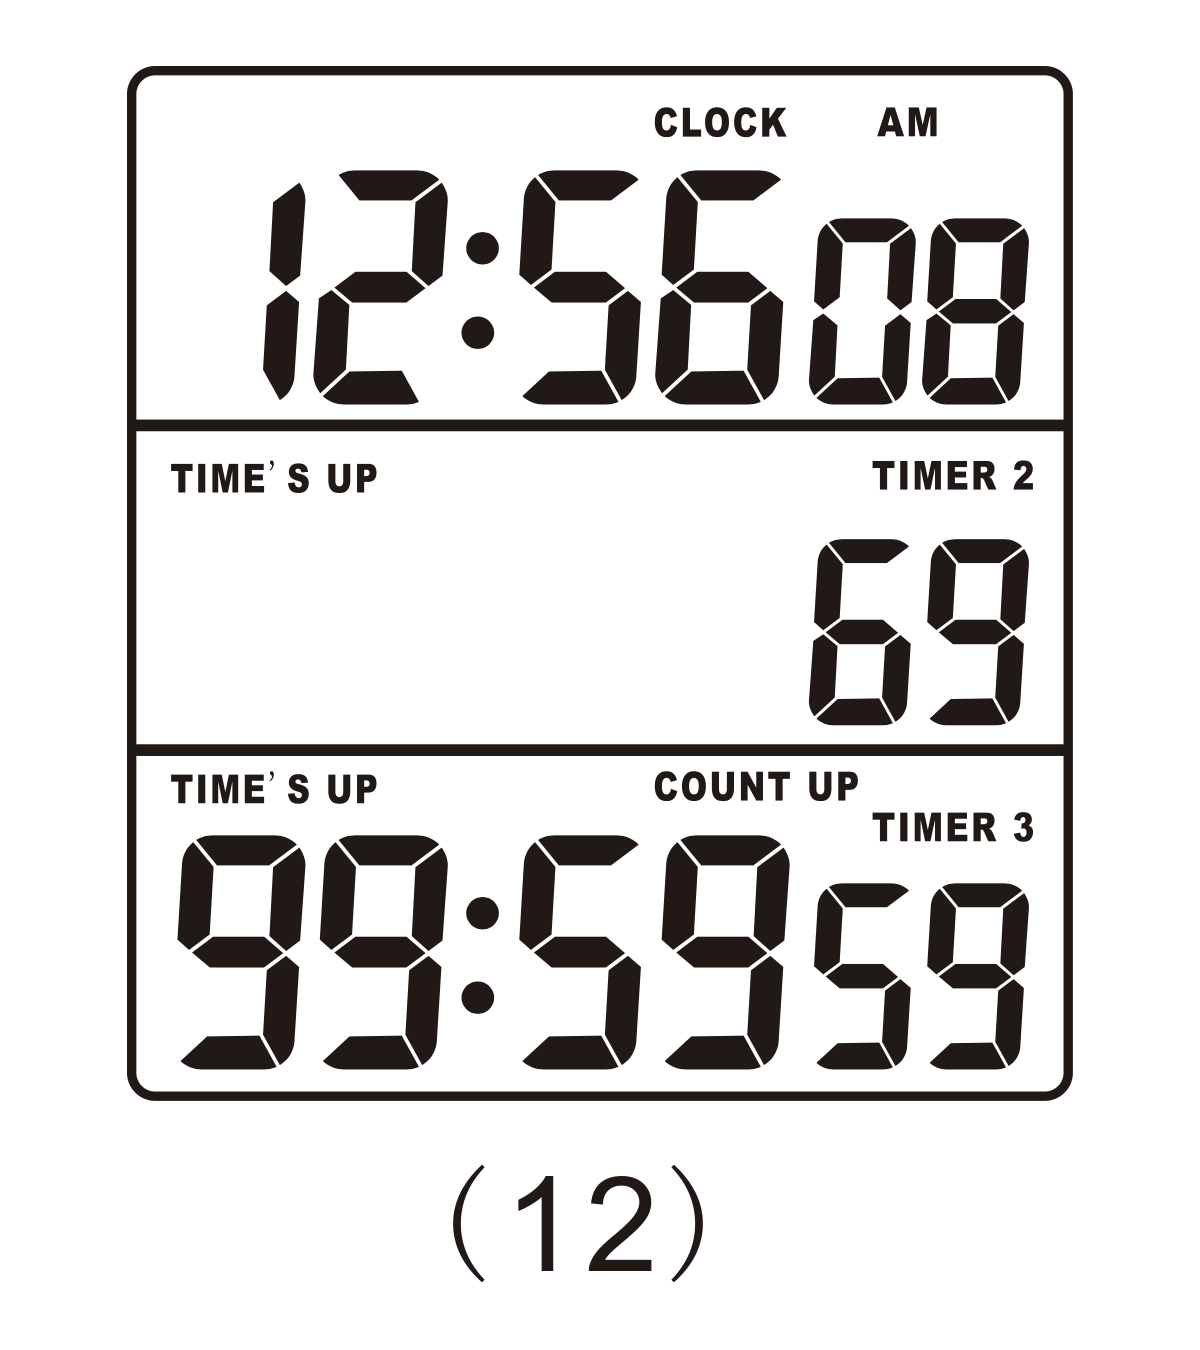
- The timer sounds for approximately 1 minute. The display flashes TIME’S UP and begins counting upward to show the elapsed time since zero.
- Press the corresponding T1, T2 or T3 button to stop the alarm for that channel.
- After completion, press the corresponding channel button to recall its previous countdown value. Press START/STOP to recall the previous values for all three channels.
- Press CLEAR to clear completed channels one at a time before making another setting.
Alarm volume
Use the selector on the rear of the timer to choose HIGH, LOW or OFF.
Battery Installation and Replacement
- Slide the battery-compartment cover downward at the marked position and remove it.
- Install two new 1.5 V AAA batteries, observing the positive (+) and negative (−) polarity marks inside the compartment.
- Always replace both batteries at the same time, then refit the cover securely.
Replace the batteries promptly if the display becomes dim or the timer stops. Keep batteries away from children. If a battery leaks, avoid skin contact, remove it safely and clean the battery compartment before installing new batteries.
Safety, Cleaning and Storage
- Do not use the timer on icy or slippery surfaces, or where it is exposed to strong magnetic fields, vibration or impact.
- Keep the timer away from high temperatures. Excessive heat may cause malfunction.
- Do not use the timer in a bathroom or another location with high humidity.
- Do not disassemble the product. Doing so may cause malfunction.
- Clean with a soft, dry cloth. If necessary, use a cloth lightly dampened with water and a mild neutral detergent, then wipe dry.
- Store this manual with the timer for future reference.
Support
For product questions or technical assistance, contact info@infinitas-scientific.com.
Productoverzicht
Specificaties
- Klokweergave: uren, minuten en seconden; AM/PM-indicatie; selecteerbaar 12- of 24-uursformaat.
- Count-up timer: resolutie tot 1/100 seconde; maximale duur 99 uur, 59 minuten en 59 seconden.
- Countdown-timer: drie onafhankelijke kanalen (T1, T2 en T3); maximale instelling 99 uur, 59 minuten en 59 seconden per kanaal.
- Alarmduur: ongeveer 1 minuut.
- Keuzeschakelaar alarmvolume: HOOG / LAAG / UIT.
- Bedrijfstemperatuur: 0–50 °C.
- Voeding: twee 1,5 V AAA-batterijen.
- Materiaal behuizing: ABS.
- LCD-formaat: ongeveer 4,38 x 3,98 cm.
- Productafmetingen: ongeveer 8,82 x 6,62 x 1,32 cm; gewicht: ongeveer 90 gram.
- Plaatsing: uitklapbare standaard voor een werkblad en magneten voor bevestiging op een geschikt metalen oppervlak.
Klok- en optelmodus
Schakelen tussen modi
Druk op CLOCK/TIMER om te schakelen tussen de normale klok/optelweergave en de driekanaals aftelweergave.
De klok instellen
- Houd in de normale klokweergave ingedrukt CLOCK/TIMER gedurende ongeveer 2 seconden totdat de uren-, minuten- en secondenwaarden knipperen.
- Druk op HR, MIN en SEC om de vereiste waarden in te stellen. Houd een knop ingedrukt om de waarde snel te verhogen.
- Druk op CLOCK/TIMER om de instelling te bevestigen en terug te keren naar de normale klokweergave.
Om te wisselen tussen de 12- en 24-uursweergave terwijl de klok normaal loopt, drukt u op HR, MIN of SEC.
Gebruik van de opteltimer
- Terwijl de normale klok/optelweergave wordt weergegeven, drukt u op START/STOP om te beginnen met optellen.
- Druk op START/STOP pauzeren. Druk er nogmaals op om door te gaan.
- Druk tijdens de pauze op CLEAR om de optelwaarde terug te zetten op nul.
Afteltimers met drie kanalen
Instelling T1, T2 of T3
- Druk op CLOCK/TIMER om de drie aftelkanalen weer te geven.
- Houd de gewenste kanaalknop ingedrukt (T1, T2 of T3) gedurende ongeveer 2 seconden totdat de waarde van dat kanaal knippert.
- Druk op HR, MIN en SEC om de gewenste afteltijd in te voeren. Houd een knop ingedrukt om de waarde snel te verhogen.
- Druk op CLEAR om de waarde die wordt bewerkt, indien nodig, te wissen.
- Druk nogmaals op dezelfde kanaalknop om de instelling te bevestigen.
- Verlaat de instelmodus van het huidige kanaal voordat u een ander kanaal instelt.
Een aftelling starten, pauzeren en resetten
- Druk op T1, T2 of T3 om het aftellen te beginnen. De drie kanalen kunnen onafhankelijk van elkaar werken.
- Druk nogmaals op de corresponderende kanaalknop om het aftellen te pauzeren. Druk er nogmaals op om door te gaan.
- Wanneer de normale klok/optelweergave wordt weergegeven, knippert de overeenkomstige TIMER 1-, TIMER 2- of TIMER 3-indicator terwijl dat kanaal aftelt.
- Terwijl een of meer aftellingen zijn gepauzeerd, drukt u op CLEAR om de gepauzeerde aftelwaarden terug te zetten op nul.
Alarm- en geheugenfuncties
Wanneer een aftelling nul bereikt
- De timer klinkt gedurende ongeveer 1 minuut. Het display knippert TIME’S UP en begint omhoog te tellen om de verstreken tijd sinds nul weer te geven.
- Druk op de overeenkomstige T1, T2 of T3 om het alarm voor dat kanaal te stoppen.
- Druk na voltooiing op de corresponderende kanaalknop om de vorige aftelwaarde op te roepen. Druk op START/STOP om de vorige waarden voor alle drie de kanalen op te roepen.
- Druk op CLEAR om voltooide kanalen één voor één te wissen voordat u een andere instelling maakt.
Alarmvolume
Gebruik de keuzeknop aan de achterkant van de timer om te kiezen HIGH, LOW of OFF.
Installatie en vervanging van de batterij
- Schuif het deksel van het batterijcompartiment naar beneden op de gemarkeerde positie en verwijder het.
- Plaats twee nieuwe AAA-batterijen van 1,5 V en let op de positieve (+) en negatieve (−) polariteitsmarkeringen in het compartiment.
- Vervang altijd beide batterijen tegelijkertijd en plaats het deksel vervolgens stevig terug.
Vervang de batterijen onmiddellijk als het display donker wordt of de timer stopt. Houd batterijen uit de buurt van kinderen. Als een batterij lekt, vermijd dan contact met de huid, verwijder de batterij op een veilige manier en maak het batterijcompartiment schoon voordat u nieuwe batterijen installeert.
Veiligheid, reiniging en opslag
- Gebruik de timer niet op ijzige of gladde oppervlakken, of waar deze wordt blootgesteld aan sterke magnetische velden, trillingen of schokken.
- Houd de timer uit de buurt van hoge temperaturen. Overmatige hitte kan storingen veroorzaken.
- Gebruik de timer niet in een badkamer of op een andere locatie met een hoge luchtvochtigheid.
- Haal het product niet uit elkaar. Als u dit wel doet, kan dit een storing veroorzaken.
- Reinig met een zachte, droge doek. Gebruik indien nodig een doek die licht is bevochtigd met water en een mild, neutraal reinigingsmiddel en veeg deze daarna droog.
- Bewaar deze handleiding bij de timer voor toekomstig gebruik.
Ondersteuning
Neem voor productvragen of technische ondersteuning contact op met info@infinitas-scientific.com.
Produktübersicht
Spezifikationen
- Clock display: hours, minutes and seconds; AM/PM indication; selectable 12- or 24-hour format.
- Count-up timer: resolution to 1/100 second; maximum duration 99 hours, 59 minutes and 59 seconds.
- Countdown-Timer: drei unabhängige Kanäle (T1, T2 und T3); maximum setting 99 hours, 59 minutes and 59 seconds per channel.
- Alarm duration: approximately 1 minute.
- Alarm-volume selector: HIGH / LOW / OFF.
- Operating temperature: 0–50 °C.
- Power supply: two 1.5 V AAA batteries.
- Gehäusematerial: ABS.
- LCD size: approximately 4.38 × 3.98 cm.
- Produktabmessungen: ca. 8,82 × 6,62 × 1,32 cm; weight: approximately 90 g.
- Placement: fold-out stand for a work surface and magnets for attachment to a suitable metal surface.
Clock and Count-Up Mode
Zwischen den Modi wechseln
Drücken Sie CLOCK/TIMER um zwischen der normalen Uhr-/Countdown-Anzeige und der Dreikanal-Countdown-Anzeige umzuschalten.
Setting the clock
- In the normal clock display, press and hold CLOCK/TIMER ca. 2 Sekunden lang gedrückt, bis die Werte für Stunde, Minute und Sekunde blinken.
- Drücken Sie HR, MIN und SEC to set the required values. Halten Sie eine Taste gedrückt, um den Wert schnell zu erhöhen.
- Drücken Sie CLOCK/TIMER um die Einstellung zu bestätigen und zur normalen Uhranzeige zurückzukehren.
Um zwischen dem 12- und 24-Stunden-Anzeigeformat zu wechseln, während die Uhr normal läuft, drücken Sie HR, MIN oder SEC.
Verwendung des Count-Up-Timers
- Während die normale Uhr-/Count-Up-Anzeige angezeigt wird, drücken Sie START/STOP to start counting up.
- Drücken Sie START/STOP innehalten. Press it again to continue.
- Drücken Sie im Pausemodus CLEAR to reset the count-up value to zero.
Three-Channel Countdown Timers
Einstellung von T1, T2 oder T3
- Drücken Sie CLOCK/TIMER to display the three countdown channels.
- Press and hold the required channel button (T1, T2 oder T3) etwa 2 Sekunden lang gedrückt, bis der Wert dieses Kanals blinkt.
- Drücken Sie HR, MIN und SEC um die gewünschte Countdown-Zeit einzugeben. Halten Sie eine Taste gedrückt, um den Wert schnell zu erhöhen.
- Drücken Sie CLEAR um den bearbeiteten Wert bei Bedarf zu löschen.
- Drücken Sie die gleiche Kanaltaste erneut, um die Einstellung zu bestätigen.
- Verlassen Sie den Einstellungsmodus des aktuellen Kanals, bevor Sie einen anderen Kanal einstellen.
Einen Countdown starten, pausieren und zurücksetzen
- Drücken Sie T1, T2 oder T3 to start its countdown. Die drei Kanäle können unabhängig voneinander betrieben werden.
- Drücken Sie die entsprechende Kanaltaste erneut, um den Countdown anzuhalten. Drücken Sie erneut, um fortzufahren.
- Wenn die normale Uhr-/Count-Up-Anzeige angezeigt wird, blinkt die entsprechende TIMER 1-, TIMER 2- oder TIMER 3-Anzeige, während dieser Kanal herunterzählt.
- Drücken Sie, während ein oder mehrere Countdowns angehalten sind CLEAR um die pausierten Countdown-Werte auf Null zurückzusetzen.
Alarm- und Speicherfunktionen
Wenn ein Countdown Null erreicht
- Der Timer ertönt etwa 1 Minute lang. The display flashes TIME’S UP und beginnt mit dem Aufwärtszählen, um die seit Null vergangene Zeit anzuzeigen.
- Press the corresponding T1, T2 oder T3 Drücken Sie die Taste, um den Alarm für diesen Kanal zu stoppen.
- Drücken Sie nach Abschluss die entsprechende Kanaltaste, um den vorherigen Countdown-Wert abzurufen. Drücken Sie START/STOP um die vorherigen Werte für alle drei Kanäle abzurufen.
- Drücken Sie CLEAR um abgeschlossene Kanäle einzeln zu löschen, bevor Sie eine andere Einstellung vornehmen.
Alarmlautstärke
Verwenden Sie zur Auswahl den Wahlschalter auf der Rückseite des Timers HIGH, LOW oder OFF.
Batterieinstallation und -austausch
- Schieben Sie den Batteriefachdeckel an der markierten Stelle nach unten und entfernen Sie ihn.
- Legen Sie zwei neue 1,5 V AAA-Batterien ein und achten Sie dabei auf die positiven (+) und negativen (-) Polaritätsmarkierungen im Fach.
- Tauschen Sie immer beide Batterien gleichzeitig aus und bringen Sie dann die Abdeckung wieder fest an.
Tauschen Sie die Batterien umgehend aus, wenn das Display dunkler wird oder der Timer stoppt. Halten Sie Batterien von Kindern fern. Wenn eine Batterie ausläuft, vermeiden Sie Hautkontakt, entfernen Sie sie sicher und reinigen Sie das Batteriefach, bevor Sie neue Batterien einsetzen.
Sicherheit, Reinigung und Lagerung
- Verwenden Sie den Timer nicht auf vereisten oder rutschigen Oberflächen oder an Orten, an denen er starken Magnetfeldern, Vibrationen oder Stößen ausgesetzt ist.
- Halten Sie den Timer von hohen Temperaturen fern. Übermäßige Hitze kann zu Fehlfunktionen führen.
- Verwenden Sie den Timer nicht in einem Badezimmer oder an einem anderen Ort mit hoher Luftfeuchtigkeit.
- Zerlegen Sie das Produkt nicht. Andernfalls kann es zu Fehlfunktionen kommen.
- Mit einem weichen, trockenen Tuch reinigen. Verwenden Sie bei Bedarf ein leicht mit Wasser und einem milden neutralen Reinigungsmittel angefeuchtetes Tuch und wischen Sie es anschließend trocken.
- Bewahren Sie dieses Handbuch zum späteren Nachschlagen zusammen mit dem Timer auf.
Unterstützung
Bei Produktfragen oder technischer Unterstützung wenden Sie sich bitte an info@infinitas-scientific.com.
Présentation du produit
Spécifications
- Affichage de l’horloge : heures, minutes et secondes ; indication AM/PM ; Format sélectionnable de 12 ou 24 heures.
- Minuterie de compte à rebours : résolution jusqu’à 1/100 de seconde ; durée maximale 99 heures, 59 minutes et 59 secondes.
- Compte à rebours : trois canaux indépendants (T1, T2 et T3) ; réglage maximum 99 heures, 59 minutes et 59 secondes par canal.
- Durée de l’alarme : environ 1 minute.
- Sélecteur de volume d’alarme : HIGH / LOW / OFF.
- Température de fonctionnement : 0 à 50 °C.
- Alimentation : deux piles AAA 1,5 V.
- Matériau du boîtier : ABS.
- Taille de l’écran LCD : environ 4,38 × 3,98 cm.
- Dimensions du produit : environ 8,82 × 6,62 × 1,32 cm ; poids : environ 90 g.
- Placement : support rabattable pour plan de travail et aimants pour fixation sur une surface métallique appropriée.
Mode horloge et compte à rebours
Basculer entre les modes
Presse CLOCK/TIMER pour basculer entre l’affichage normal de l’horloge/compte à rebours et l’affichage du compte à rebours à trois canaux.
Régler l’horloge
- Dans l’affichage normal de l’horloge, appuyez et maintenez CLOCK/TIMER pendant environ 2 secondes jusqu’à ce que les valeurs des heures, des minutes et des secondes clignotent.
- Presse HR, MIN et SEC pour définir les valeurs requises. Appuyez et maintenez un bouton pour faire avancer sa valeur rapidement.
- Presse CLOCK/TIMER pour confirmer le réglage et revenir à l’affichage normal de l’horloge.
Pour basculer entre les formats d’affichage 12 et 24 heures pendant que l’horloge fonctionne normalement, appuyez sur HR, MIN ou SEC.
Utiliser le compte à rebours
- Pendant que l’affichage normal de l’horloge et du compte à rebours est affiché, appuyez sur START/STOP pour commencer à compter.
- Presse START/STOP faire une pause. Appuyez à nouveau dessus pour continuer.
- Pendant la pause, appuyez sur CLEAR pour remettre la valeur du compte à zéro.
Comptes à rebours à trois canaux
Réglage T1, T2 ou T3
- Presse CLOCK/TIMER pour afficher les trois canaux de compte à rebours.
- Appuyez et maintenez enfoncé le bouton de canal requis (T1, T2 ou T3) pendant environ 2 secondes jusqu’à ce que la valeur de ce canal clignote.
- Presse HR, MIN et SEC pour saisir le temps de compte à rebours requis. Appuyez et maintenez un bouton pour faire avancer sa valeur rapidement.
- Presse CLEAR pour effacer la valeur en cours de modification, si nécessaire.
- Appuyez à nouveau sur le même bouton de canal pour confirmer le réglage.
- Quittez le mode de réglage du canal actuel avant de définir un autre canal.
Démarrer, mettre en pause et réinitialiser un compte à rebours
- Presse T1, T2 ou T3 pour lancer son compte à rebours. Les trois canaux peuvent fonctionner indépendamment.
- Appuyez à nouveau sur le bouton de la chaîne correspondante pour mettre ce compte à rebours en pause. Appuyez à nouveau dessus pour continuer.
- Lorsque l’affichage normal de l’horloge/du compte à rebours est affiché, l’indicateur TIMER 1, TIMER 2 ou TIMER 3 correspondant clignote pendant le compte à rebours de ce canal.
- Pendant qu’un ou plusieurs comptes à rebours sont en pause, appuyez sur CLEAR pour remettre à zéro les valeurs du compte à rebours en pause.
Fonctions d’alarme et de mémoire
Quand un compte à rebours atteint zéro
- La minuterie sonne pendant environ 1 minute. L’affichage clignote TIME’S UP et commence à compter vers le haut pour afficher le temps écoulé depuis zéro.
- Appuyez sur la touche correspondante T1, T2 ou T3 bouton pour arrêter l’alarme pour ce canal.
- Une fois terminé, appuyez sur le bouton du canal correspondant pour rappeler sa valeur de compte à rebours précédente. Presse START/STOP pour rappeler les valeurs précédentes pour les trois canaux.
- Presse CLEAR pour effacer les chaînes terminées une par une avant de procéder à un autre réglage.
Volume de l’alarme
Utilisez le sélecteur à l’arrière de la minuterie pour choisir HIGH, LOW ou OFF.
Installation et remplacement de la batterie
- Faites glisser le couvercle du compartiment à piles vers le bas jusqu’à la position marquée et retirez-le.
- Installez deux nouvelles piles AAA de 1,5 V, en respectant les marques de polarité positive (+) et négative (-) à l’intérieur du compartiment.
- Remplacez toujours les deux piles en même temps, puis remettez bien le couvercle en place.
Remplacez les piles rapidement si l’affichage devient faible ou si la minuterie s’arrête. Gardez les piles hors de portée des enfants. Si une pile fuit, évitez tout contact avec la peau, retirez-la en toute sécurité et nettoyez le compartiment à piles avant d’installer de nouvelles piles.
Sécurité, nettoyage et stockage
- N’utilisez pas la minuterie sur des surfaces glacées ou glissantes, ou là où elle est exposée à de puissants champs magnétiques, vibrations ou impacts.
- Gardez la minuterie à l’écart des températures élevées. Une chaleur excessive peut provoquer un dysfonctionnement.
- N’utilisez pas la minuterie dans une salle de bain ou dans un autre endroit très humide.
- Ne démontez pas le produit. Cela pourrait provoquer un dysfonctionnement.
- Nettoyer avec un chiffon doux et sec. Si nécessaire, utilisez un chiffon légèrement imbibé d’eau et d’un détergent neutre doux, puis essuyez.
- Conservez ce manuel avec la minuterie pour référence future.
Assistance
Pour des questions sur les produits ou une assistance technique, contactez info@infinitas-scientific.com.
Descripción general del producto
Especificaciones
- Visualización del reloj: horas, minutos y segundos; indicación AM/PM; formato seleccionable de 12 o 24 horas.
- Temporizador de cuenta atrás: resolución a 1/100 de segundo; duración máxima 99 horas, 59 minutos y 59 segundos.
- Temporizador de cuenta atrás: tres canales independientes (T1, T2 y T3); configuración máxima 99 horas, 59 minutos y 59 segundos por canal.
- Duración de la alarma: aproximadamente 1 minuto.
- Selector de volumen de alarma: ALTO / BAJO / APAGADO.
- Temperatura de funcionamiento: 0–50 °C.
- Fuente de alimentación: dos pilas AAA de 1,5 V.
- Material de la carcasa: ABS.
- Tamaño de la pantalla LCD: aproximadamente 4,38 × 3,98 cm.
- Dimensiones del producto: aproximadamente 8,82 × 6,62 × 1,32 cm; peso: aproximadamente 90 g.
- Colocación: soporte plegable para superficie de trabajo e imanes para fijar a una superficie metálica adecuada.
Modo de reloj y cuenta atrás
Cambiar entre modos
prensa CLOCK/TIMER para cambiar entre la visualización normal de reloj/cuenta ascendente y la visualización de cuenta regresiva de tres canales.
Poniendo el reloj
- En la visualización normal del reloj, mantenga presionado CLOCK/TIMER durante aproximadamente 2 segundos hasta que los valores de hora, minutos y segundos parpadeen.
- prensa HR, MIN y SEC para establecer los valores requeridos. Mantenga presionado un botón para avanzar su valor rápidamente.
- prensa CLOCK/TIMER para confirmar la configuración y volver a la visualización normal del reloj.
Para cambiar entre los formatos de visualización de 12 y 24 horas mientras el reloj está funcionando normalmente, presione HR, MIN o SEC.
Usando el cronómetro de cuenta atrás
- Mientras se muestra la pantalla normal de reloj/cuenta ascendente, presione START/STOP para empezar a contar.
- prensa START/STOP hacer una pausa. Presiónelo nuevamente para continuar.
- Mientras está en pausa, presione CLEAR para restablecer el valor de conteo a cero.
Temporizadores de cuenta regresiva de tres canales
Configuración de T1, T2 o T3
- prensa CLOCK/TIMER para mostrar los tres canales de cuenta regresiva.
- Mantenga presionado el botón del canal requerido (T1, T2 o T3) durante aproximadamente 2 segundos hasta que el valor de ese canal parpadee.
- prensa HR, MIN y SEC para ingresar el tiempo de cuenta regresiva requerido. Mantenga presionado un botón para avanzar su valor rápidamente.
- prensa CLEAR para borrar el valor que se está editando, si es necesario.
- Presione nuevamente el mismo botón de canal para confirmar la configuración.
- Salga del modo de configuración del canal actual antes de configurar otro canal.
Iniciar, pausar y restablecer una cuenta regresiva
- prensa T1, T2 o T3 para iniciar su cuenta regresiva. Los tres canales pueden funcionar de forma independiente.
- Presione el botón del canal correspondiente nuevamente para pausar esa cuenta regresiva. Presiónelo nuevamente para continuar.
- Cuando se muestra la pantalla normal de reloj/cuenta ascendente, el indicador TIMER 1, TIMER 2 o TIMER 3 correspondiente parpadea mientras ese canal está en cuenta regresiva.
- Mientras una o más cuentas regresivas están en pausa, presione CLEAR para restablecer a cero los valores de cuenta atrás pausados.
Funciones de alarma y memoria
Cuando una cuenta regresiva llega a cero
- El temporizador suena durante aproximadamente 1 minuto. La pantalla parpadea TIME’S UP y comienza a contar hacia arriba para mostrar el tiempo transcurrido desde cero.
- Presione el correspondiente T1, T2 o T3 para detener la alarma de ese canal.
- Una vez completado, presione el botón del canal correspondiente para recuperar su valor de cuenta regresiva anterior. prensa START/STOP para recuperar los valores anteriores para los tres canales.
- prensa CLEAR para borrar los canales completados uno a la vez antes de realizar otra configuración.
Volumen de alarma
Utilice el selector en la parte trasera del temporizador para elegir HIGH, LOW o OFF.
Instalación y reemplazo de baterías
- Deslice la tapa del compartimiento de la batería hacia abajo en la posición marcada y retírela.
- Instale dos baterías AAA nuevas de 1,5 V, observando las marcas de polaridad positiva (+) y negativa (-) dentro del compartimiento.
- Reemplace siempre ambas baterías al mismo tiempo y luego vuelva a colocar la tapa de forma segura.
Reemplace las baterías rápidamente si la pantalla se oscurece o el cronómetro se detiene. Mantenga las baterías fuera del alcance de los niños. Si una batería tiene fugas, evite el contacto con la piel, retírela de manera segura y limpie el compartimiento de la batería antes de instalar baterías nuevas.
Seguridad, limpieza y almacenamiento
- No utilice el temporizador sobre superficies heladas o resbaladizas, ni donde esté expuesto a fuertes campos magnéticos, vibraciones o impactos.
- Mantenga el temporizador alejado de altas temperaturas. El calor excesivo puede provocar un mal funcionamiento.
- No utilice el temporizador en un baño u otro lugar con mucha humedad.
- No desmonte el producto. Hacerlo podría causar un mal funcionamiento.
- Limpiar con un paño suave y seco. Si es necesario, utilice un paño ligeramente humedecido con agua y un detergente neutro suave y luego séquelo.
- Guarde este manual con el temporizador para consultarlo en el futuro.
Soporte
Para preguntas sobre productos o asistencia técnica, comuníquese con info@infinitas-scientific.com.
Visão geral do produto
Especificações
- Exibição do relógio: horas, minutos e segundos; Indicação AM/PM; formato selecionável de 12 ou 24 horas.
- Temporizador de contagem progressiva: resolução de 1/100 segundo; duração máxima 99 horas, 59 minutos e 59 segundos.
- Contador regressivo: três canais independentes (T1, T2 e T3); configuração máxima 99 horas, 59 minutos e 59 segundos por canal.
- Duração do alarme: aproximadamente 1 minuto.
- Seletor de volume do alarme: ALTO / BAIXO / DESLIGADO.
- Temperatura operacional: 0–50 °C.
- Fonte de alimentação: duas pilhas AAA de 1,5 V.
- Material da carcaça: ABS.
- Tamanho do LCD: aproximadamente 4,38 × 3,98 cm.
- Dimensões do produto: aproximadamente 8,82 × 6,62 × 1,32 cm; peso: aproximadamente 90 g.
- Colocação: suporte desdobrável para superfície de trabalho e ímãs para fixação em superfície metálica adequada.
Modo Relógio e Contagem Progressiva
Alternando entre modos
Pressione CLOCK/TIMER para alternar entre a exibição normal do relógio/contagem progressiva e a exibição da contagem regressiva de três canais.
Acertar o relógio
- Na exibição normal do relógio, pressione e segure CLOCK/TIMER por aproximadamente 2 segundos até que os valores da hora, minuto e segundo pisquem.
- Pressione HR, MIN e SEC para definir os valores necessários. Pressione e segure um botão para avançar seu valor rapidamente.
- Pressione CLOCK/TIMER para confirmar a configuração e retornar à exibição normal do relógio.
Para alterar entre os formatos de exibição de 12 e 24 horas enquanto o relógio está funcionando normalmente, pressione HR, MIN ou SEC.
Usando o cronômetro de contagem progressiva
- Enquanto a exibição normal do relógio/contagem progressiva é exibida, pressione START/STOP para começar a contar.
- Pressione START/STOP para fazer uma pausa. Pressione-o novamente para continuar.
- Durante a pausa, pressione CLEAR para redefinir o valor da contagem para zero.
Temporizadores de contagem regressiva de três canais
Configuração T1, T2 ou T3
- Pressione CLOCK/TIMER para exibir os três canais de contagem regressiva.
- Pressione e segure o botão do canal desejado (T1, T2 ou T3) por aproximadamente 2 segundos até que o valor desse canal pisque.
- Pressione HR, MIN e SEC para inserir o tempo de contagem regressiva necessário. Pressione e segure um botão para avançar seu valor rapidamente.
- Pressione CLEAR para limpar o valor que está sendo editado, se necessário.
- Pressione o mesmo botão de canal novamente para confirmar a configuração.
- Saia do modo de configuração do canal atual antes de definir outro canal.
Iniciar, pausar e reiniciar uma contagem regressiva
- Pressione T1, T2 ou T3 para iniciar sua contagem regressiva. Os três canais podem operar de forma independente.
- Pressione o botão do canal correspondente novamente para pausar a contagem regressiva. Pressione-o novamente para continuar.
- Quando o display normal do relógio/contagem progressiva é mostrado, o indicador TIMER 1, TIMER 2 ou TIMER 3 correspondente pisca enquanto o canal está em contagem regressiva.
- Enquanto uma ou mais contagens regressivas estão pausadas, pressione CLEAR para redefinir os valores da contagem regressiva pausada para zero.
Funções de alarme e memória
Quando uma contagem regressiva chega a zero
- O cronômetro soa por aproximadamente 1 minuto. O display pisca TIME’S UP e começa a contar para cima para mostrar o tempo decorrido desde zero.
- Pressione o correspondente T1, T2 ou T3 botão para parar o alarme para esse canal.
- Após a conclusão, pressione o botão do canal correspondente para recuperar o valor da contagem regressiva anterior. Pressione START/STOP para recuperar os valores anteriores para todos os três canais.
- Pressione CLEAR para limpar os canais concluídos, um de cada vez, antes de fazer outra configuração.
Volume do alarme
Use o seletor na parte traseira do cronômetro para escolher HIGH, LOW ou OFF.
Instalação e substituição da bateria
- Deslize a tampa do compartimento da bateria para baixo na posição marcada e remova-a.
- Instale duas novas pilhas AAA de 1,5 V, observando as marcas de polaridade positiva (+) e negativa (-) dentro do compartimento.
- Sempre substitua as duas baterias ao mesmo tempo e, em seguida, recoloque a tampa com segurança.
Substitua as pilhas imediatamente se o visor ficar escuro ou o cronômetro parar. Mantenha as baterias longe do alcance das crianças. Se uma bateria vazar, evite o contato com a pele, remova-a com segurança e limpe o compartimento da bateria antes de instalar novas baterias.
Segurança, Limpeza e Armazenamento
- Não use o cronômetro em superfícies geladas ou escorregadias, ou onde esteja exposto a fortes campos magnéticos, vibrações ou impactos.
- Mantenha o cronômetro longe de altas temperaturas. O calor excessivo pode causar mau funcionamento.
- Não use o cronômetro em um banheiro ou outro local com alta umidade.
- Não desmonte o produto. Fazer isso pode causar mau funcionamento.
- Limpe com um pano macio e seco. Se necessário, use um pano levemente umedecido com água e detergente neutro neutro e depois seque.
- Guarde este manual junto com o cronômetro para referência futura.
Suporte
Para dúvidas sobre produtos ou assistência técnica, entre em contato info@infinitas-scientific.com.
Panoramica del prodotto
Specifiche
- Visualizzazione dell’orologio: ore, minuti e secondi; Indicazione AM/PM; formato selezionabile 12 o 24 ore.
- Conteggio alla rovescia: risoluzione a 1/100 di secondo; durata massima 99 ore, 59 minuti e 59 secondi.
- Conto alla rovescia: tre canali indipendenti (T1, T2 e T3); impostazione massima 99 ore, 59 minuti e 59 secondi per canale.
- Durata dell’allarme: circa 1 minuto.
- Selettore volume allarme: ALTO / BASSO / SPENTO.
- Temperatura di funzionamento: 0–50 °C.
- Alimentazione: due batterie AAA da 1,5 V.
- Materiale della custodia: ABS.
- Dimensioni LCD: circa 4,38 × 3,98 cm.
- Dimensioni del prodotto: circa 8,82 × 6,62 × 1,32 cm; peso: 90 g circa.
- Posizionamento: supporto pieghevole per piano di lavoro e magneti per il fissaggio su una superficie metallica adatta.
Modalità orologio e conto alla rovescia
Passaggio da una modalità all’altra
Premere CLOCK/TIMER per passare dalla visualizzazione normale dell’orologio/conteggio alla visualizzazione del conto alla rovescia a tre canali.
Impostazione dell’orologio
- Nella visualizzazione normale dell’orologio, tenere premuto CLOCK/TIMER per circa 2 secondi finché i valori di ore, minuti e secondi lampeggiano.
- Premere HR, MIN e SEC per impostare i valori richiesti. Tenere premuto un pulsante per far avanzare rapidamente il suo valore.
- Premere CLOCK/TIMER per confermare l’impostazione e tornare alla normale visualizzazione dell’orologio.
Per passare dal formato di visualizzazione a 12 a quello a 24 ore mentre l’orologio funziona normalmente, premere HR, MIN o SEC.
Utilizzo del timer per il conto alla rovescia
- Mentre viene visualizzato il display normale dell’orologio/conteggio, premere START/STOP per iniziare a contare.
- Premere START/STOP mettere in pausa. Premerlo di nuovo per continuare.
- Durante la pausa, premere CLEAR per ripristinare il valore del conteggio a zero.
Conto alla rovescia a tre canali
Impostazione T1, T2 o T3
- Premere CLOCK/TIMER per visualizzare i tre canali del conto alla rovescia.
- Tenere premuto il pulsante del canale richiesto (T1, T2 o T3) per circa 2 secondi finché il valore del canale non lampeggia.
- Premere HR, MIN e SEC per inserire il tempo del conto alla rovescia richiesto. Tenere premuto un pulsante per far avanzare rapidamente il suo valore.
- Premere CLEAR per cancellare il valore in corso di modifica, se necessario.
- Premere nuovamente lo stesso pulsante del canale per confermare l’impostazione.
- Uscire dalla modalità di impostazione del canale corrente prima di impostare un altro canale.
Avvio, pausa e ripristino del conto alla rovescia
- Premere T1, T2 o T3 per iniziare il conto alla rovescia. I tre canali possono funzionare in modo indipendente.
- Premere nuovamente il pulsante del canale corrispondente per mettere in pausa il conto alla rovescia. Premerlo di nuovo per continuare.
- Quando viene visualizzato il display normale dell’orologio/conteggio, l’indicatore TIMER 1, TIMER 2 o TIMER 3 corrispondente lampeggia mentre il canale esegue il conto alla rovescia.
- Mentre uno o più conti alla rovescia sono in pausa, premere CLEAR per ripristinare a zero i valori del conto alla rovescia messo in pausa.
Funzioni di allarme e memoria
Quando un conto alla rovescia raggiunge lo zero
- Il timer suona per circa 1 minuto. Il display lampeggia TIME’S UP e inizia a contare verso l’alto per mostrare il tempo trascorso dallo zero.
- Premere il corrispondente T1, T2 o T3 per interrompere l’allarme per quel canale.
- Al termine, premere il pulsante del canale corrispondente per richiamare il valore del conto alla rovescia precedente. Premere START/STOP per richiamare i valori precedenti per tutti e tre i canali.
- Premere CLEAR per cancellare i canali completati uno alla volta prima di effettuare un’altra impostazione.
Volume dell’allarme
Utilizzare il selettore sul retro del timer per scegliere HIGH, LOW o OFF.
Installazione e sostituzione della batteria
- Far scorrere il coperchio del vano batteria verso il basso nella posizione contrassegnata e rimuoverlo.
- Installare due nuove batterie AAA da 1,5 V, rispettando i segni di polarità positiva (+) e negativa (-) all’interno del vano.
- Sostituire sempre entrambe le batterie contemporaneamente, quindi rimontare saldamente il coperchio.
Sostituire tempestivamente le batterie se il display si affievolisce o il timer si ferma. Tenere le batterie lontano dalla portata dei bambini. Se una batteria perde, evitare il contatto con la pelle, rimuoverla in modo sicuro e pulire il vano batteria prima di installare nuove batterie.
Sicurezza, pulizia e conservazione
- Non utilizzare il timer su superfici ghiacciate o scivolose o dove è esposto a forti campi magnetici, vibrazioni o urti.
- Tenere il timer lontano dalle alte temperature. Il calore eccessivo può causare malfunzionamenti.
- Non utilizzare il timer in un bagno o in un altro luogo con elevata umidità.
- Non smontare il prodotto. Ciò potrebbe causare malfunzionamenti.
- Pulire con un panno morbido e asciutto. Se necessario, utilizzare un panno leggermente inumidito con acqua e un detergente neutro delicato, quindi asciugare.
- Conservare questo manuale insieme al timer per riferimento futuro.
Supporto
Per domande sul prodotto o assistenza tecnica, contattare info@infinitas-scientific.com.
Přehled produktu
Specifikace
- Zobrazení hodin: hodiny, minuty a sekundy; AM/PM indication; volitelný 12- nebo 24-hodinový formát.
- Časovač odpočítávání: rozlišení do 1/100 sekundy; maximální doba trvání 99 hodin, 59 minut a 59 sekund.
- Odpočítávací časovač: tři nezávislé kanály (T1, T2 a T3); maximální nastavení 99 hodin, 59 minut a 59 sekund na kanál.
- Doba trvání alarmu: přibližně 1 minuta.
- Volič hlasitosti alarmu: HIGH / LOW / OFF.
- Provozní teplota: 0–50 °C.
- Napájení: dvě 1,5V AAA baterie.
- Materiál pouzdra: ABS.
- Velikost LCD: přibližně 4,38 × 3,98 cm.
- Rozměry produktu: přibližně 8,82 × 6,62 × 1,32 cm; hmotnost: cca 90 g.
- Umístění: rozkládací stojan na pracovní plochu a magnety pro připevnění na vhodnou kovovou plochu.
Režim hodin a odpočítávání
Přepínání mezi režimy
Stiskněte CLOCK/TIMER pro přepínání mezi normálním zobrazením hodin/počítání a tříkanálovým zobrazením odpočítávání.
Nastavení hodin
- V normálním zobrazení hodin stiskněte a podržte CLOCK/TIMER for approximately 2 seconds until the hour, minute and second values flash.
- Stiskněte HR, MIN a SEC pro nastavení požadovaných hodnot. Press and hold a button to advance its value quickly.
- Stiskněte CLOCK/TIMER to confirm the setting and return to the normal clock display.
To change between 12- and 24-hour display formats while the clock is running normally, press HR, MIN nebo SEC.
Použití odpočítávacího časovače
- While the normal clock/count-up display is shown, press START/STOP začít počítat.
- Stiskněte START/STOP pozastavit. Chcete-li pokračovat, stiskněte jej znovu.
- V pauze stiskněte CLEAR pro resetování načítané hodnoty na nulu.
Tříkanálové odpočítávací časovače
Nastavení T1, T2 nebo T3
- Stiskněte CLOCK/TIMER zobrazíte tři odpočítávací kanály.
- Stiskněte a podržte tlačítko požadovaného kanálu (T1, T2 nebo T3) for approximately 2 seconds until that channel’s value flashes.
- Stiskněte HR, MIN a SEC zadejte požadovaný čas odpočítávání. Stisknutím a podržením tlačítka rychle posunete jeho hodnotu.
- Stiskněte CLEAR v případě potřeby vymažte upravovanou hodnotu.
- Stiskněte znovu stejné tlačítko kanálu pro potvrzení nastavení.
- Před nastavením dalšího kanálu opusťte režim nastavení aktuálního kanálu.
Spuštění, pozastavení a resetování odpočítávání
- Stiskněte T1, T2 nebo T3 aby se spustilo jeho odpočítávání. Tyto tři kanály mohou fungovat nezávisle.
- Dalším stisknutím tlačítka příslušného kanálu odpočítávání pozastavíte. Chcete-li pokračovat, stiskněte jej znovu.
- Když se zobrazí normální zobrazení hodin/odpočítávání, odpovídající indikátor TIMER 1, TIMER 2 nebo TIMER 3 bliká, zatímco daný kanál odpočítává.
- Zatímco je jedno nebo více odpočítávání pozastaveno, stiskněte CLEAR pro resetování pozastavených hodnot odpočítávání na nulu.
Funkce alarmu a paměti
Když odpočítávání dosáhne nuly
- Časovač zní přibližně 1 minutu. Displej bliká TIME’S UP a začne počítat nahoru, aby se zobrazil čas uplynulý od nuly.
- Stiskněte odpovídající T1, T2 nebo T3 tlačítko pro zastavení alarmu pro daný kanál.
- Po dokončení stiskněte příslušné tlačítko kanálu pro vyvolání předchozí hodnoty odpočítávání. Stiskněte START/STOP pro vyvolání předchozích hodnot pro všechny tři kanály.
- Stiskněte CLEAR pro vymazání dokončených kanálů jeden po druhém, než provedete další nastavení.
Hlasitost alarmu
Pro výběr použijte volič na zadní straně časovače HIGH, LOW nebo OFF.
Instalace a výměna baterie
- Posuňte kryt přihrádky na baterie směrem dolů na označené místo a sejměte jej.
- Nainstalujte dvě nové 1,5 V baterie AAA, přičemž dodržujte značky kladné (+) a záporné (-) polarity uvnitř přihrádky.
- Vždy vyměňte obě baterie současně a poté bezpečně nasaďte kryt.
Pokud displej ztmavne nebo se zastaví časovač, okamžitě vyměňte baterie. Udržujte baterie mimo dosah dětí. Pokud baterie vyteče, vyhněte se kontaktu s pokožkou, před instalací nových baterií ji bezpečně vyjměte a vyčistěte přihrádku na baterie.
Bezpečnost, čištění a skladování
- Nepoužívejte časovač na zledovatělém nebo kluzkém povrchu nebo tam, kde je vystaven silným magnetickým polím, vibracím nebo nárazům.
- Chraňte časovač před vysokými teplotami. Nadměrné teplo může způsobit poruchu.
- Nepoužívejte časovač v koupelně nebo na jiném místě s vysokou vlhkostí.
- Výrobek nerozebírejte. Mohlo by dojít k poruše.
- Čistěte měkkým suchým hadříkem. V případě potřeby použijte hadřík lehce navlhčený vodou a jemným neutrálním čisticím prostředkem a poté vytřete do sucha.
- Uschovejte tento návod s časovačem pro budoucí použití.
Podpora
V případě dotazů k produktu nebo technické pomoci kontaktujte info@infinitas-scientific.com.